
Multiple maps and versions
A project can hold several maps, and each map can hold several versions. A version is a copy of one map. Use one to edit an alternative while keeping the current state. The screen shows one version of one map at a time.
Maps and versions are handled with the two buttons just below the Map Hierarchy header in the right panel. The Switch map button on the left shows the current map’s name, and the Manage versions button on the right shows the current version’s name. Both buttons are shown even when the project has only one map. In Background edit mode, the two buttons are hidden.
When you switch maps or versions, the current map is saved and then the map or version you chose opens. In the trial, your edits are kept when you switch maps or versions, and are lost when you quit the app or open another project. See Trial and full version.
In a Together (coming soon) session, only the host switches maps and versions. See Editing together.
Map list
Section titled “Map list”Click the Switch map button to open the project’s list of maps. The map that is open now has a check mark, and a map with more than one version shows how many versions it has. Click a row to switch to that map, and use the buttons on the right of the row to manage it.
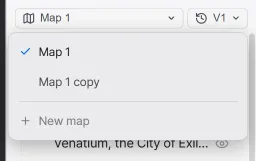
| Element | Description |
|---|---|
| Duplicate this map | Copies that map’s current version into a new map and switches to the copy. The copy is named “map name copy”. The original map’s other versions are not copied. |
| Rename | Renames the map. |
| Delete | Deletes the map along with all of its versions. The files go to the trash. |
| New map | Adds a map to the current project. It sits at the bottom of the list. |
Add a map
Section titled “Add a map”New map in the map list adds a map to the current project. It is a different button from Create New Map on the first screen, which creates a new project.
-
Click the Switch map button to open the map list, then click New map at the bottom. The New map window appears.
-
Enter a name for the new map. The name field starts with a numbered name such as “Map 2”.
-
Under Start from, choose Blank map or “Copy of map name”. Choosing a copy copies that map’s current version. If you have not typed a name yourself, the name field changes to “map name copy”.
-
If you chose Blank map, pick the shape of the area shown as the map under Canvas Size. Choose from Full (no limit), Wide (16:9), Standard (4:3), Square (1:1), and Portrait (3:4). If you choose a copy, this field disappears. The copy keeps the original map’s area.
-
Click Create to create the new map and switch to it.
A map made with Blank map starts with no regions or markers, and the values in the Current Map tab of Settings start at their defaults. Only the attachment location carries over the value of the map that was open. You can change the canvas size later with Edit area in Background edit mode.
Versions
Section titled “Versions”Click the Manage versions button to open the current map’s list of versions. Each row shows the date the version was made. Click a row to switch to that version, and use the buttons on the right of the row to manage it.
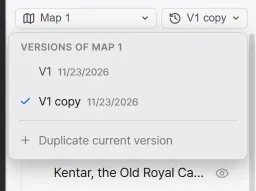
| Element | Description |
|---|---|
| Duplicate this version | Copies that version into a new version right below it and switches to the copy. The copy is named “version name copy”. |
| Rename | Renames the version. |
| Delete | Deletes the version. The files go to the trash. |
| Duplicate current version | Copies the version that is open now and switches to the copy. It sits at the bottom of the list. |
Edits you make after duplicating are saved to the copy, and the original version stays as it was when you duplicated it. When you switch to another version of the same map, the view stays where it was.
What each map saves on its own
Section titled “What each map saves on its own”Maps and versions are saved in files of their own. The items below are saved separately for each map and each version.
- Regions and markers
- Terrain and stamps
- The background’s visuals (terrain colors, advanced climates, custom terrain, textures, coastline, stamp colors and sizes)
- Roads and text
- Images placed on the map
- Grid and contours
- Scale and canvas size
- The values in the Current Map tab of Settings
Documents are saved in the project folder and shared by every map. You can link regions and markers from several maps to the same document.
Move regions to another map
Section titled “Move regions to another map”Regions and markers can be copied and pasted into another map or version. When you copy a region, the regions and markers below it in the map hierarchy are copied with it.
-
Select the region or marker to move on the map and press
Ctrl+C. You can also right-click the item in the map hierarchy and choose Copy. -
Open the map or version to paste into with Switch map or Manage versions.
-
Press
Ctrl+V. What you copied is placed at its original coordinates and selected.
When you paste into another map or version, names and document links are kept. The regions and markers on the original map stay where they are. If you no longer need them after the move, delete them from the original map. For pasting into the same map, see Edit regions and hierarchy.
What you copied is cleared when you open another project.